How I set up and work with this website
Posted on Sat 03 August 2019 in Python • 6 min read
In this article I will go through how I set up this website. What my workflow looks like, updating content and configurations. Also how I set up a staging environment and a production environment with automatic builds and deployment. And how I can do almost anything from any of my devices (iOS and MacOS).
This website is created with the Pelican static site generator. So the public website is only static files (html, css, images etc). I have in previous years had websites on wordpress and squarespace, to name a couple. But now I wanted something very simple without to much functionality, just content. And also I wanted it to be fast.
Another wish I had, was that it would be low cost. In my scenario the only thing I currently pay for is the domain name.
Technologies and services used
The technologies and services I use for my website are:
- Pelican (static site generator)
- Python
- GitHub (one private and one public repo)
- Netlify (build and preview my staging environment)
- CircleCI (build and deploy to my production environment)
- Working Copy (iOS app)
Architectural overview
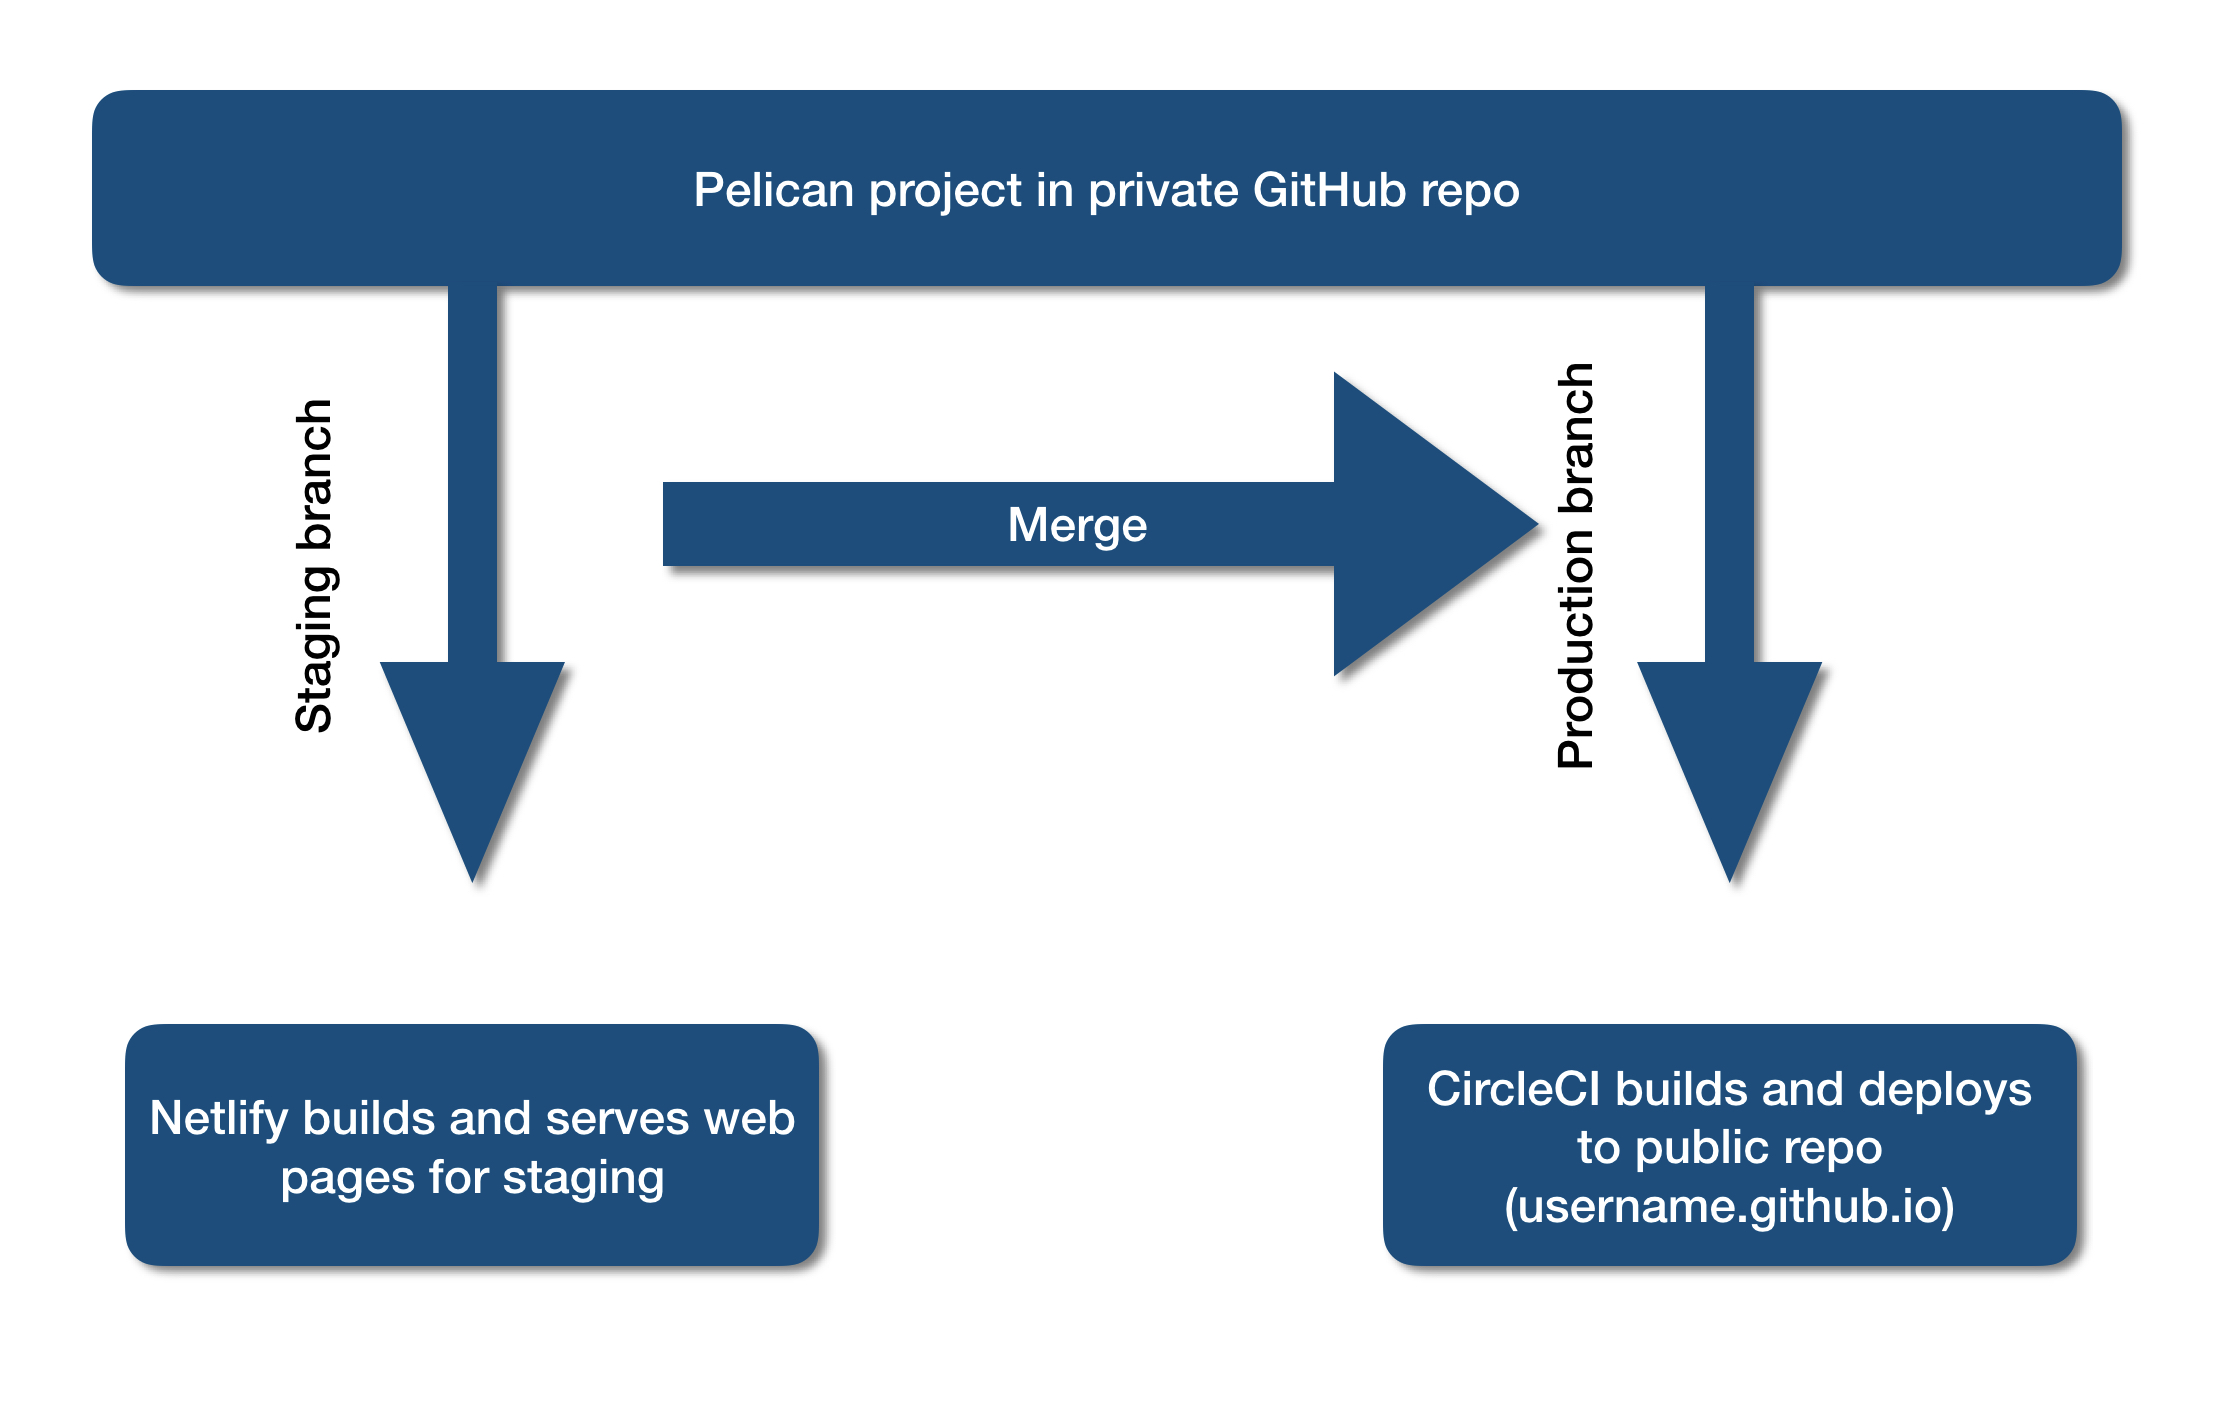
In this picture you can see a diagram over how the different things in my workflow connects together. One staging branch, and a production (master) branch, which at commits triggers a build on Netlify and CircleCI respectively.
Later in this article I’ll describe how the builds work and the build scripts for each of the branches.

Local development environment
In my case, I don’t actually need a local development environment once I’ve set up the project and pushed it to my private GitHub. Netlify and CircleCI builds automatically depending on which branch I commit to. Still I have a local environment on my MacBook where I can try out certain things and immediately see the results without pushing to github.
MacBook
So, on my MacBook I have a local Git repo which I work on in either PyCharm or Visual Studio code. There is a virtual environment for the project which has Pelican and its dependencies installed.
After doing any changes, I tell Pelican to generate the static website and I can browse it locally and see the results. Also I can use the following command to make Pelican serve my pages locally, and automatically regenerate the static files when I do changes:
Pelican -r --listen
I do my work on a staging branch which I periodically commit and push to a private GitHub repo. This automatically triggers Netlify to build and serve my site on a anonymous url.
If I want to go to production, all I have to do is merge the staging branch into master, and CircleCI publishes to my GitHub pages.
iPad and iPhone
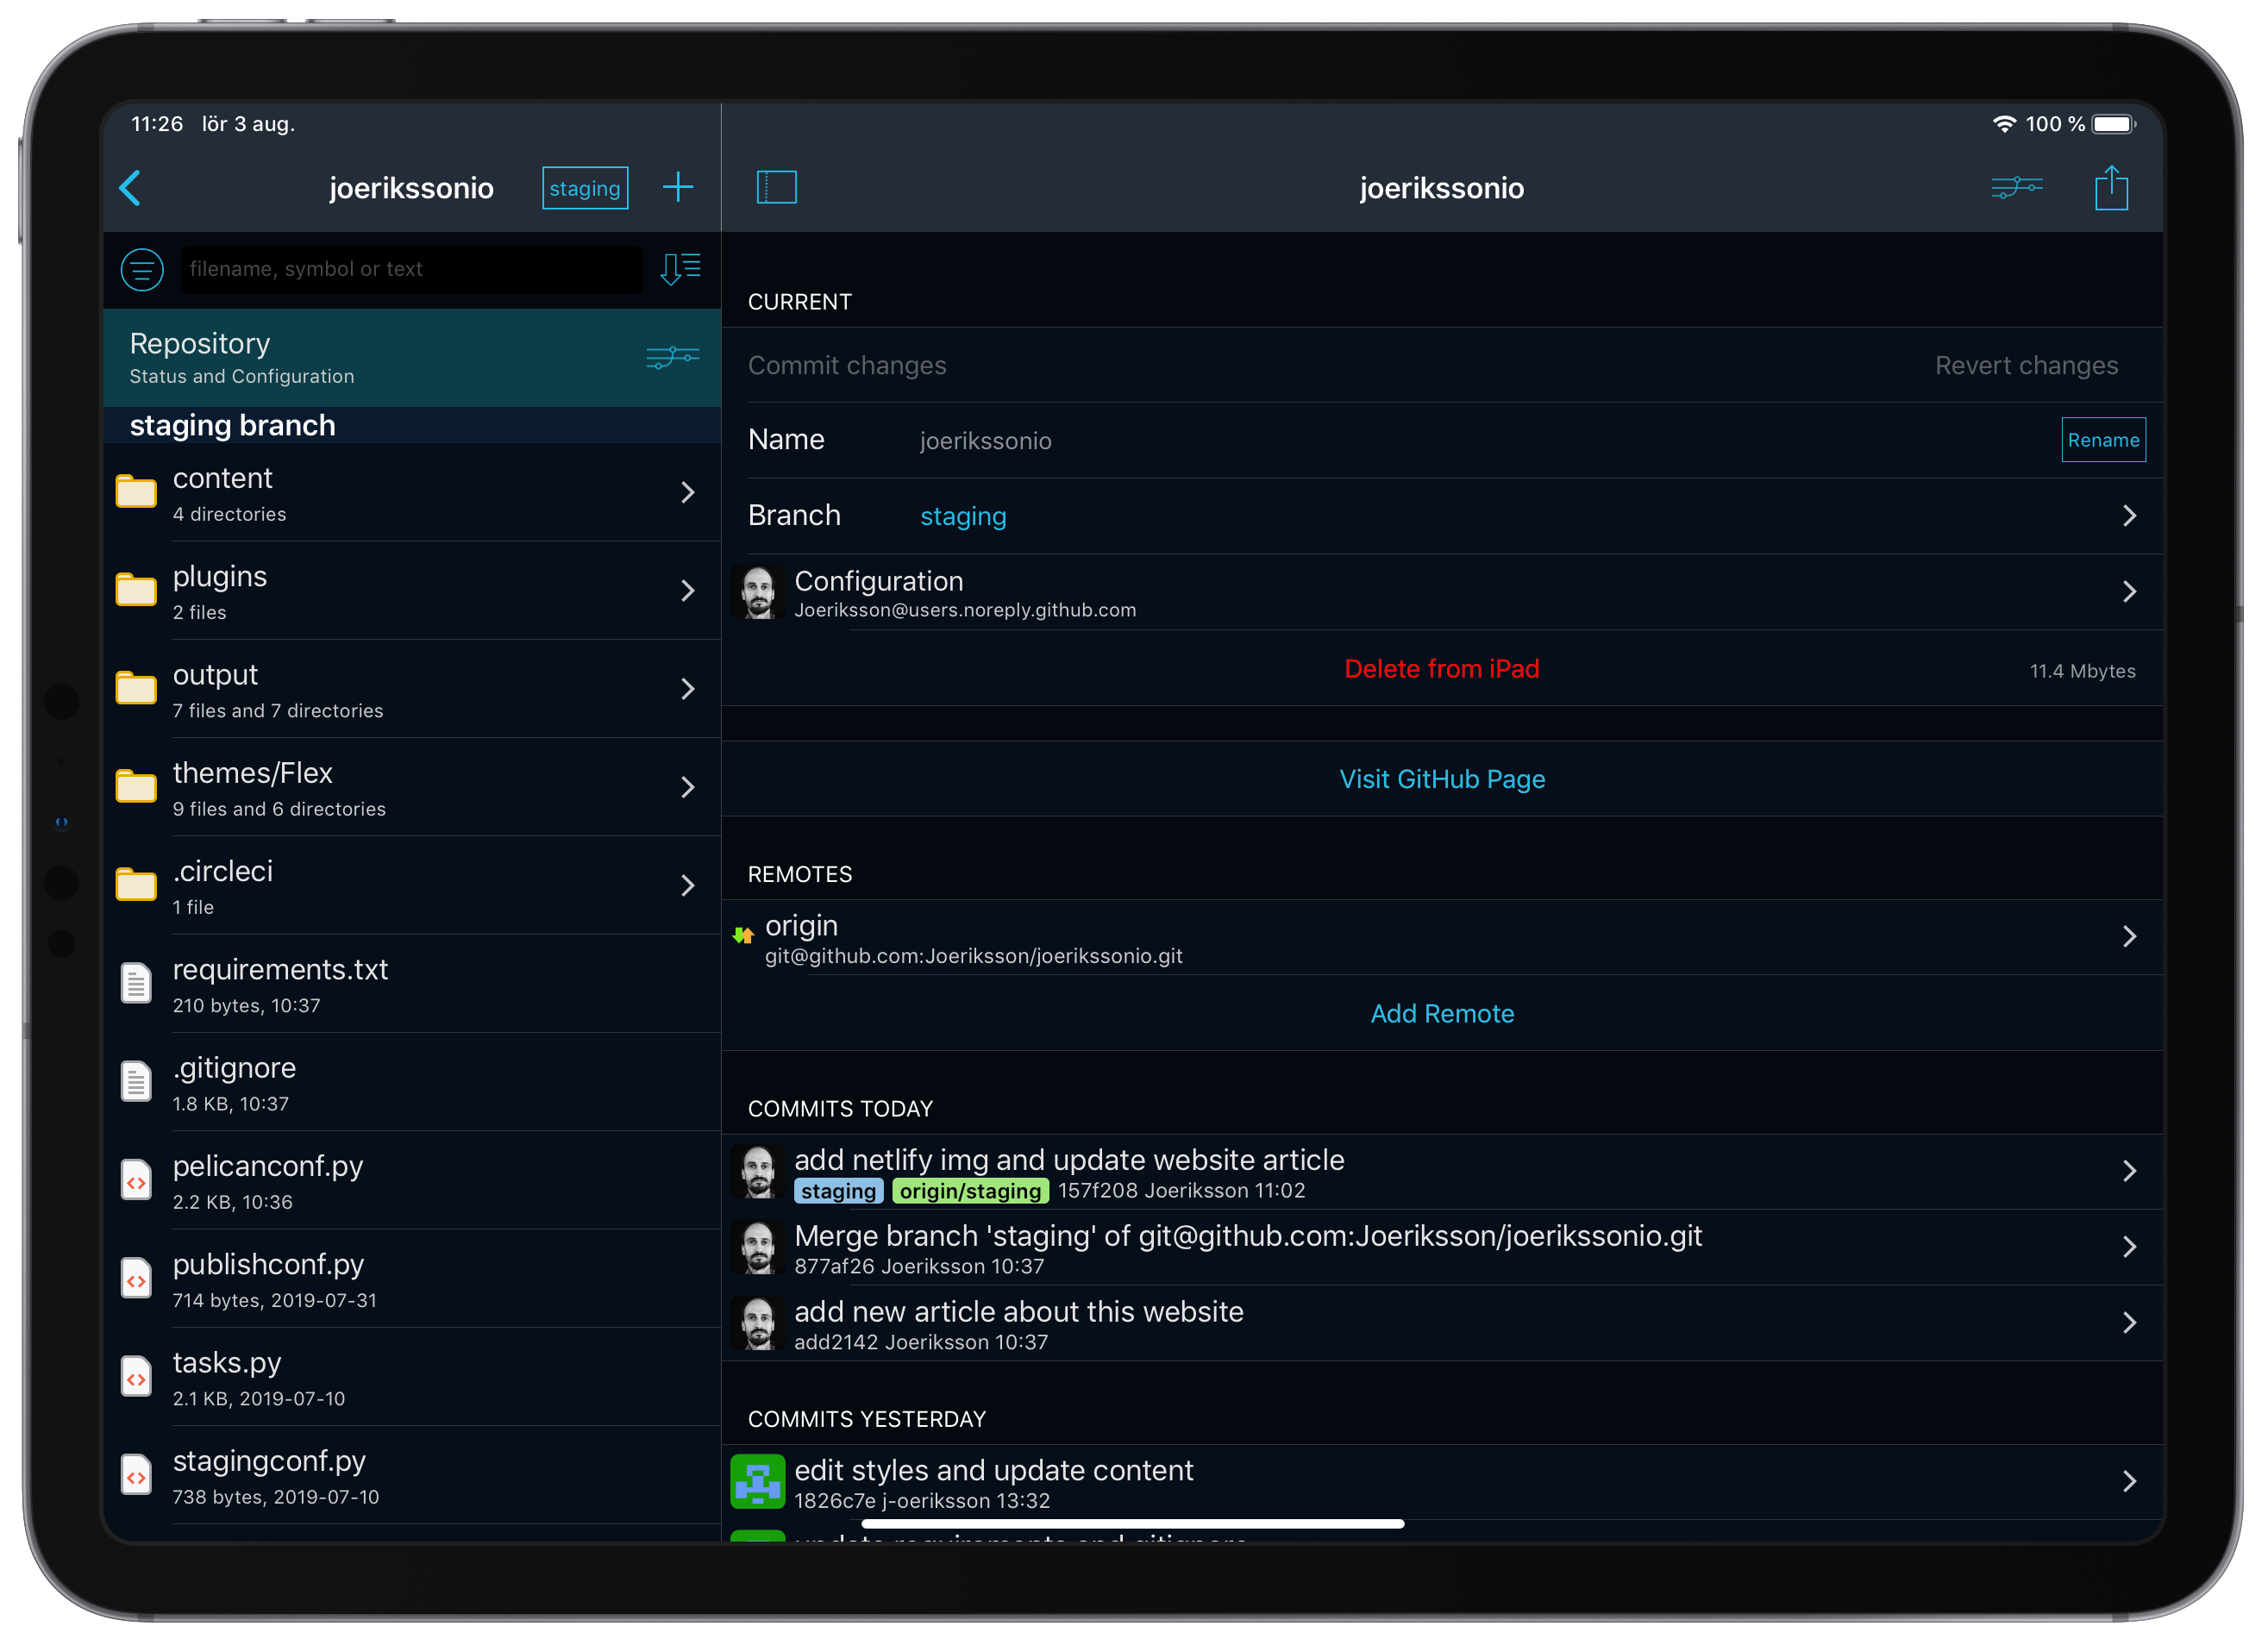
I can work on my private repo on both my iPad and iPhone with the help of the Working Copy App. Working Copy is a Git client app for iOS. With Working Copy I can edit, commit, push, pull etc. It also gives other apps access to the repos. For example, in Working Copy I can choose to open a MarkDown file in Ulysses, BearApp or some other Markdown Editor. When I am finished editing, I just switch back to Working Copy, and the changes are automatically saved into the file in the repo (doesn't work with any app, but Ulysses handles this nicely).
One disadvantage when working on iOS is that I can not directly preview the results of what I’ve done. I first need to commit and push to my staging branch and let it build before I can browse to it in Safari. But for now I don’t see that as a big problem.
Building to the staging environment with Netlify
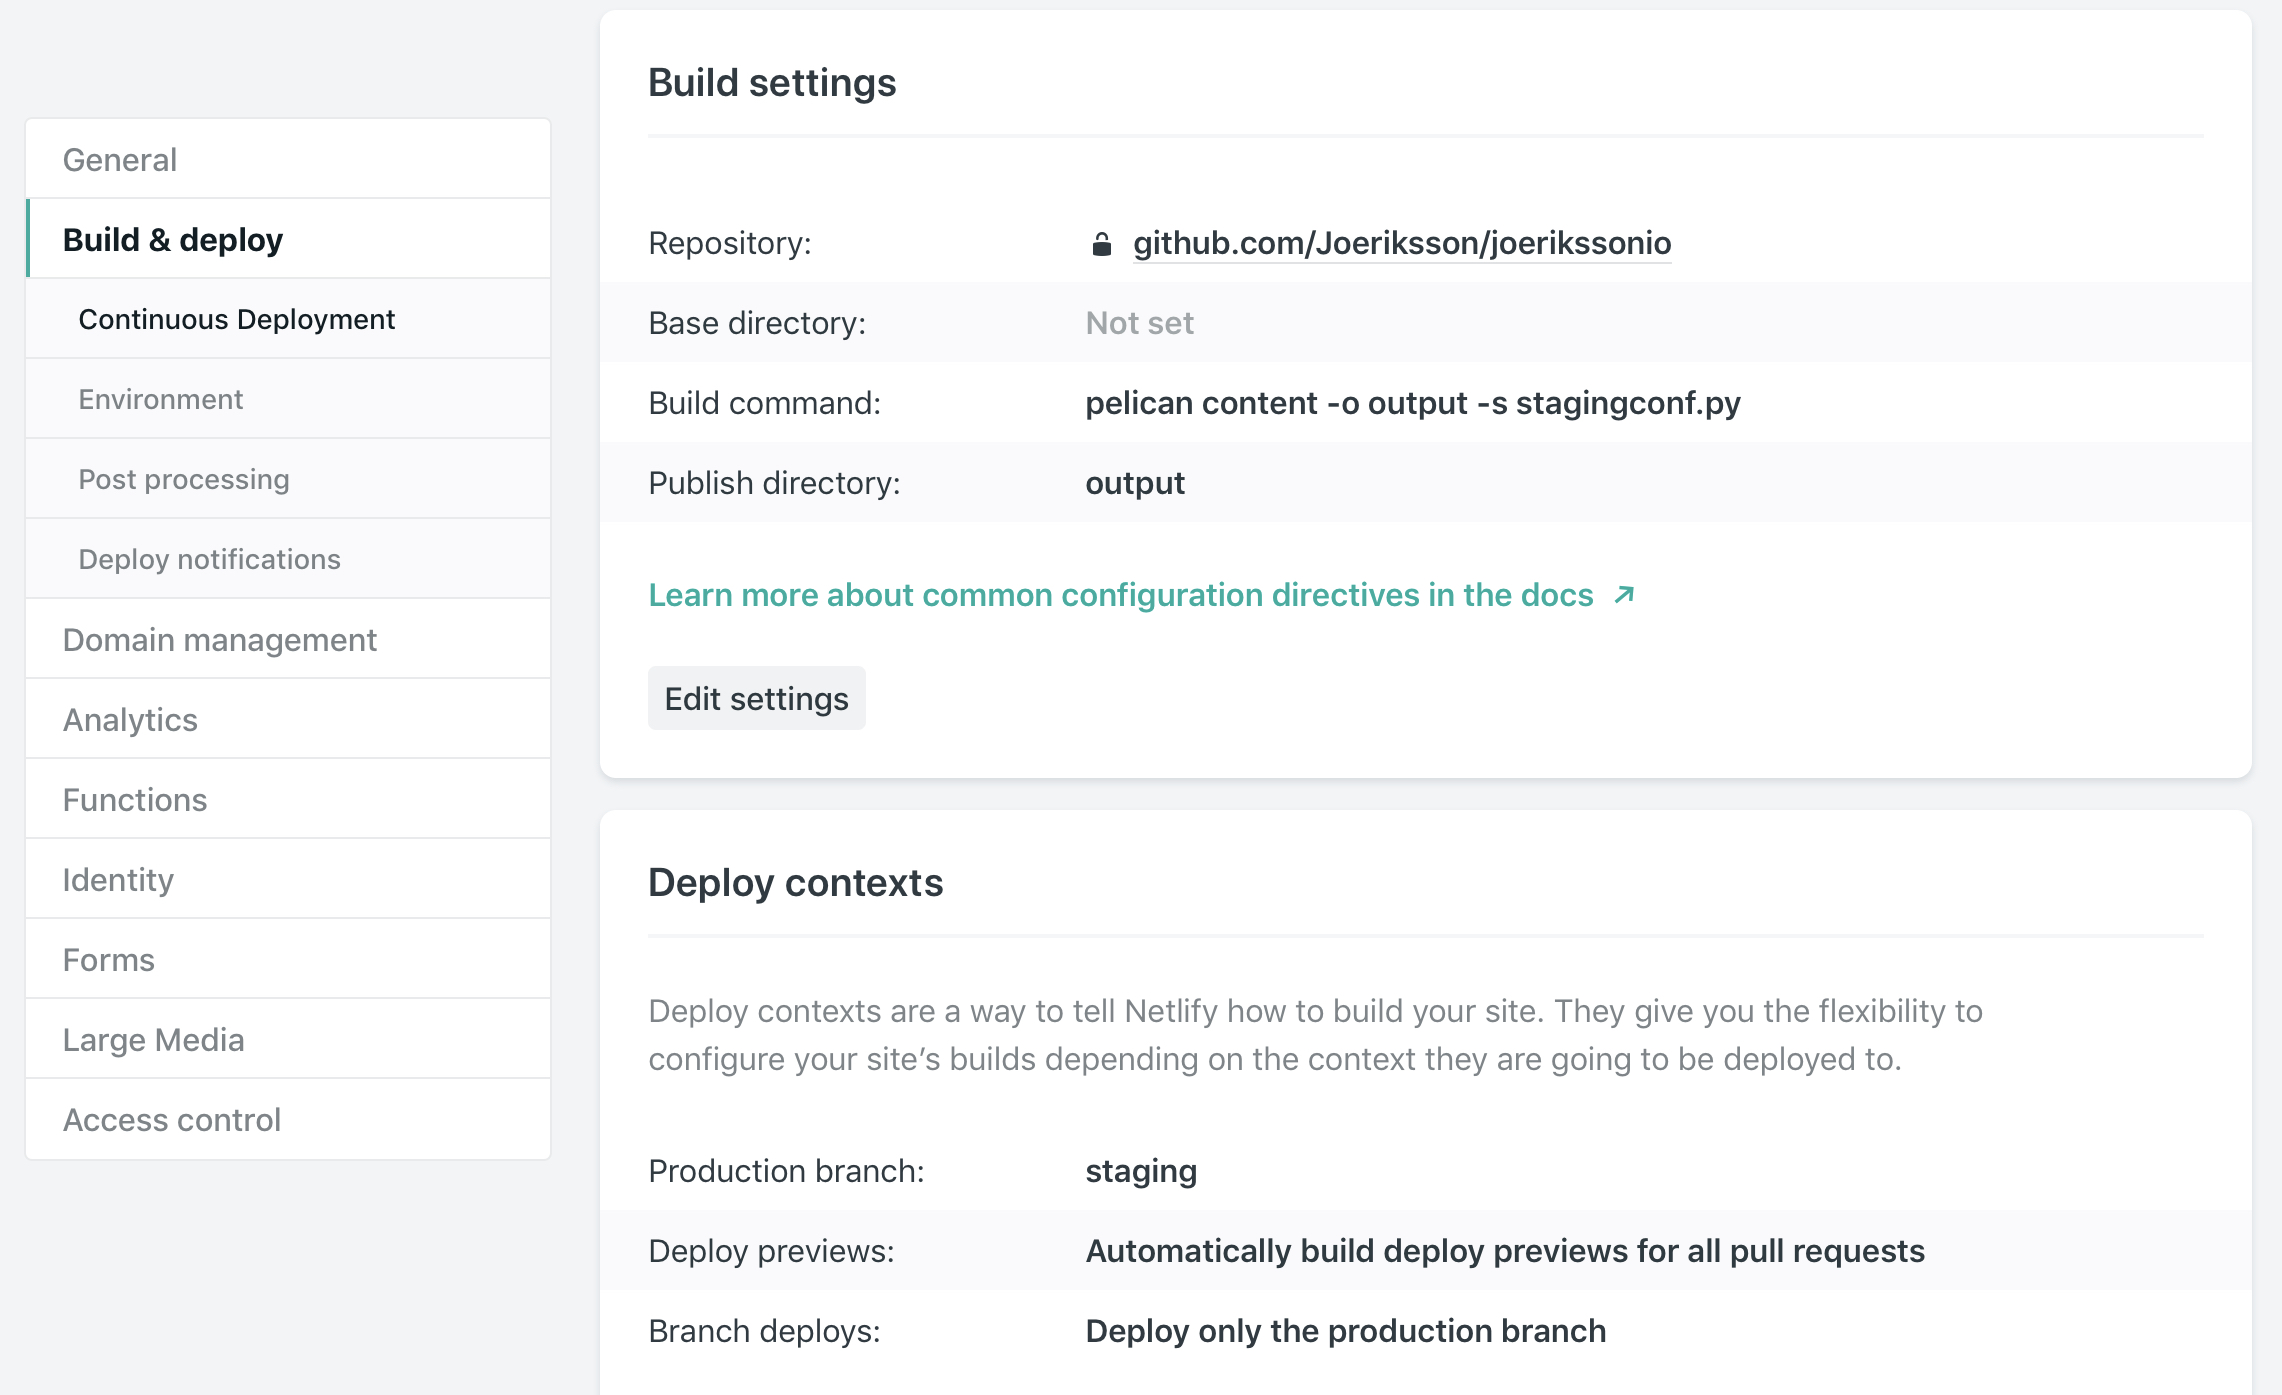
When you setup a project on Netlify, you get the option to connect it to a GitHub repository. I connected a Netlify project to my private repo on GitHub containing the whole Pelican project. The only other configurations I did can be seen in the image below.

I put in the build command, which is just the standard Pelican command. I do have a separate stagingconf.py, which is a copy of the publishconf.py but with the Netlify SiteUrl.
Also, under Deploy Contexts I've set the staging branch as Production branch, so it only builds from the staging branch.
Build script
As seen in the picture above, the build script is just a simple:
pelican content -o output -s stagingconf.py
Building to the production environment with CircleCI
One reason that I choose CircleCI for the production branch, is that I couldn't find an easy way to do what I wanted with Netlify (although I am sure it is possible). I wanted to build the master branch from the private repo, and just publish the static files generated to my public repo (GitHub pages at github.io). So the public repo would not contain anything but the static files.
I found a build script that did what I wanted after som googling (see Resources below for where I got it). I did some small modifications to the build script. Also you'll find the full build script further down in this article.
Basically I have just changed the TARGET_REPO parameter, and at the bottom added a workflow so that it only triggers on commits to the master branch, and not on the staging branch.
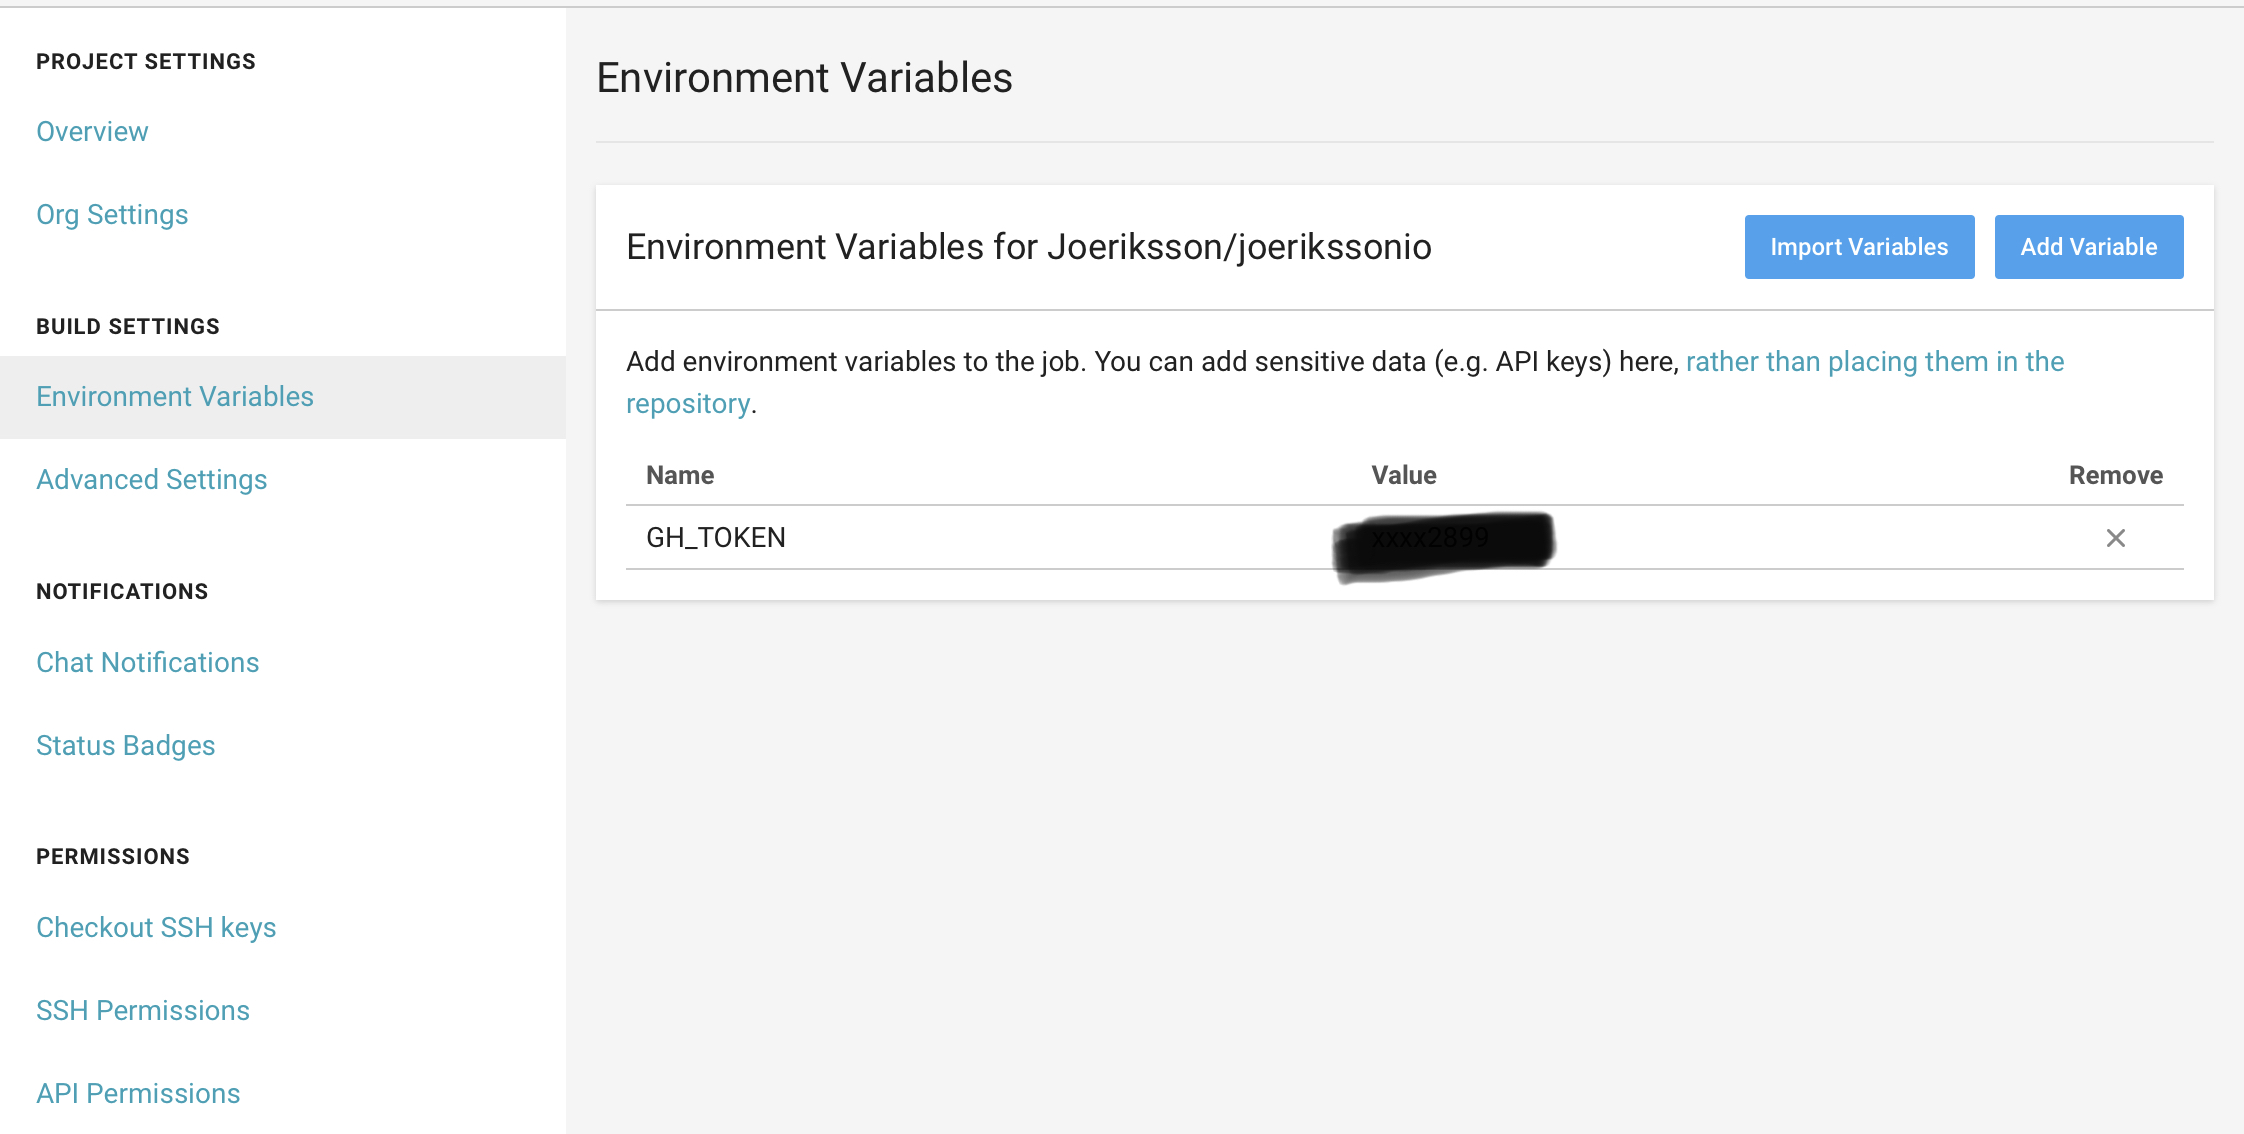
As you can see in the script further below, we need to have a GitHub Token in the git -clone command. I store this token in an enviroment variable in CircleCI and are calling it GH_TOKEN.

Build script
I created a config.yml file in a .circleci directory in the root of the private repo with the following content.
version: 2
jobs:
  build:
    docker:
      - image: circleci/python:3.7.1
    working_directory: ~/repo
    environment:
      BRANCH: master
      TARGET_REPO: joeriksson/joeriksson.github.io.git
      PELICAN_OUTPUT_FOLDER: output
    steps:
      - checkout

      # Download and cache dependencies
      - restore_cache:
          keys:
            - v1-dependencies-{{ checksum "requirements.txt" }}
            # fallback to using the latest cache if no exact match is found
            - v1-dependencies-

      - run:
          name: install dependencies
          command: |
            python3 -m venv venv
            . venv/bin/activate
            pip install -r requirements.txt
      - run:
          name: build static pages with Pelican
          command: |
            . venv/bin/activate
            pelican content -o output -s publishconf.py
      - save_cache:
          paths:
            - ./venv
          key: v1-dependencies-{{ checksum "requirements.txt" }}

      - deploy:
          name: Deploy static pages to Github Pages
          command: |
            if [ "${CIRCLE_BRANCH}" = "master" ]; then
              echo -e "Starting to deploy to Github Pages\n"
              cd ~/repo
              git config --global user.email "builds@circleci.com"
              git config --global user.name "CircleCI"
              #using token clone gh-pages branch
              git clone --quiet --branch=$CIRCLE_BRANCH https://${GH_TOKEN}@github.com/$TARGET_REPO built_website > /dev/null
              # Installing rsync
              echo "Installing rsync"
              sudo apt-get -y install rsync
              #go into directory and copy data we're interested in to that directory
              cd built_website
              echo "rsync built code with checked out code..."
              rsync -r --exclude=.git --delete ../$PELICAN_OUTPUT_FOLDER/ ./
              #add, commit and push files
              echo "add files to git..."
              git add -f .
              echo "commit files to git repository..."
              if git commit -m "CircleCI build $CIRCLE_BUILD_NUM pushed to Github Pages" ; then
                echo "git push files with force..."
                git push -fq origin $BRANCH > /dev/null
                echo -e "Deploy completed\n"
              else
                echo "Content not changed, nothing to deploy"
              fi
            else
              echo "Not master branch, dry run only"
            fi
workflows:
  version: 2
  main:
    jobs:
      - build:
          filters:
            branches:
              only: master
Conclusion
I find this setup and workflow works pretty well. It might not be simple compared to hosting on Wordpress when looking at the setup, commiting, building etc. But when writing only text articles with some code samples, there are not a lot of options to get confused by. Also there is currently not any functionality on the website, like for example comments sections (comments can always be done via my Twitter). The Netlify and CircleCI builds works very good in my opinion, and I find hosting the website at GitHub pages serves the webpages really fast.
As the number of articles increase, I might add some search functionality via a Pelican plugin. I will post more articles in the future on different things I've added or modified in Pelican for my website.
Let me know via Twitter if you find something is missing in this article, or if you have any question regarding it.
